

Cat Water Fountain Filter Replacement: A Complete Guide
That slimy film building up in your cat's fountain isn't just gross, it's a sign your filter is overdue. Most cat owners buy a fountain, run it for months, and never think about cat water fountain filters replacement until the water starts smelling off or the flow slows to a trickle. By then, you're already dealing with mineral buildup and bacteria your cat can taste.
Here's the direct answer: most carbon filters need swapping every 2 to 4 weeks, while stainless steel cat water fountain filters can last months longer if you clean them properly between washes. The exact timing depends on your water hardness, how many pets share the fountain, and the filter material itself.
This guide walks you through everything: how to tell when a filter for pet water fountain needs changing, the differences between filter types, and a simple step-by-step process for cleaning and replacing them without spilling water everywhere. We'll also cover how to pick the right pet water fountain replacement filters so your cat always has fresh, appealing water to drink.
What to know before replacing your fountain filter
Before you touch a screwdriver, understand what your filter actually does. Most cat fountains use activated carbon to pull chlorine, odors, and heavy metal taste out of tap water, while a foam pre-filter traps hair and food debris before it hits the pump. Stainless steel cat water fountain filters skip the carbon layer entirely and rely on fine mesh to catch debris, which is why they can be rinsed and reused for months instead of replaced every few weeks. Knowing which type sits in your fountain right now changes how often you should be shopping for a pet water fountain filter replacement.
How often to replace each filter type
Replacement schedules aren't one-size-fits-all. Water hardness, the number of cats sharing the bowl, and whether you run the fountain 24/7 all shift the timeline in either direction.
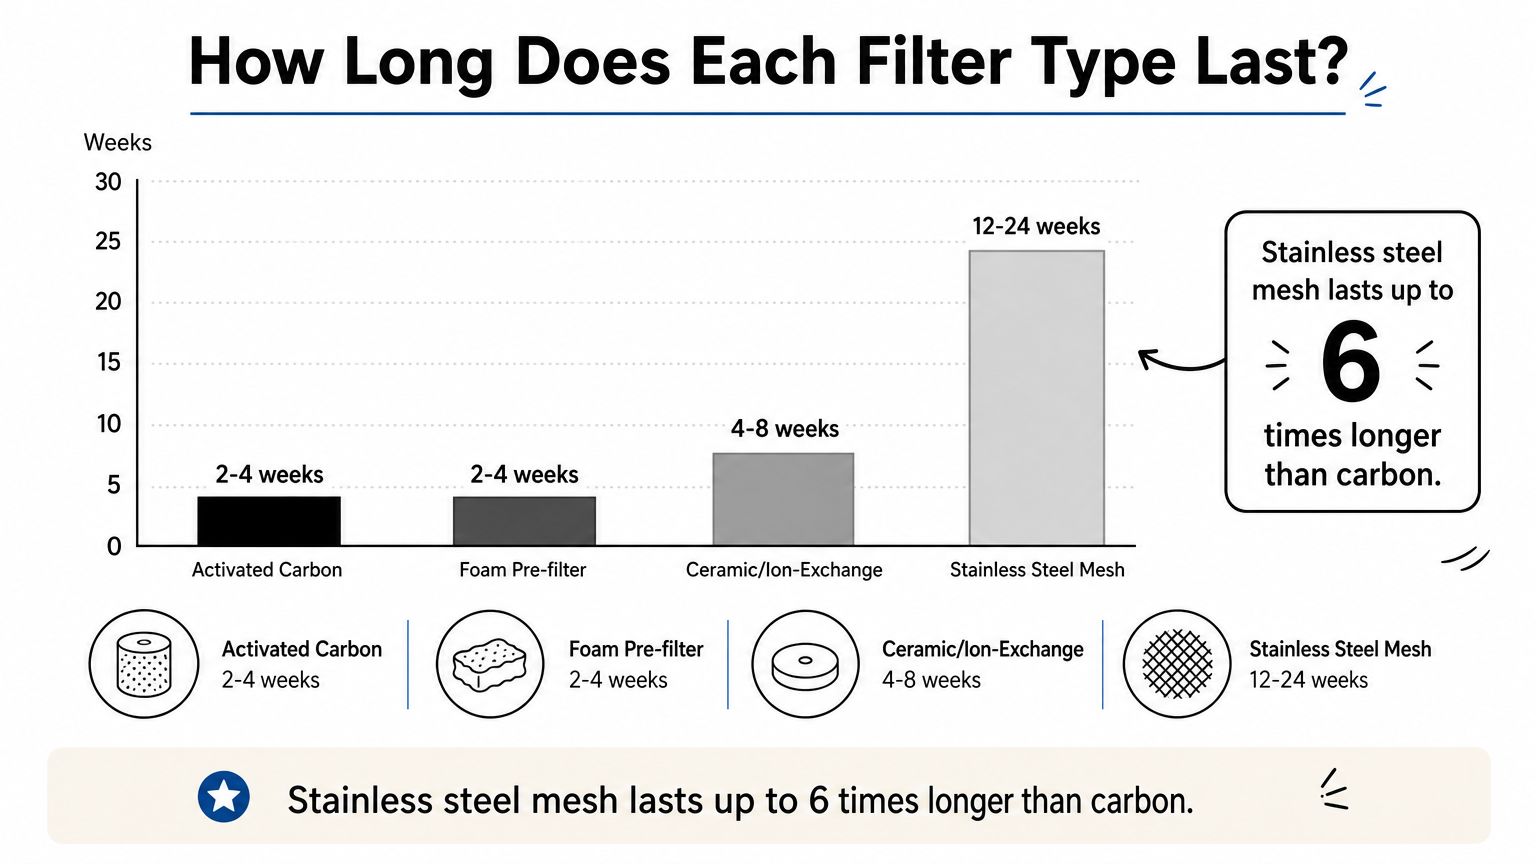
| Filter type | Typical lifespan | Best for |
|---|---|---|
| Activated carbon | 2 to 4 weeks | Removing chlorine taste and odor |
| Foam pre-filter | 2 to 4 weeks (rinse weekly) | Trapping hair and debris |
| Stainless steel mesh | 3 to 6 months (with regular cleaning) | Multi-cat homes, hard water areas |
| Ceramic/ion-exchange | 4 to 8 weeks | Reducing limescale buildup |
Another point worth flagging: households with two or more cats burn through carbon filters faster because more drinking and splashing pushes debris through the system quicker.
A filter that looks clean can still be chemically exhausted, so go by calendar weeks, not appearance alone.
Signs your filter needs replacing now
Occasionally your cat's behavior tells you before the calendar does. Watch for these warning signs that a water filter for pet fountain has hit the end of its useful life:
- Water has a musty or plastic smell even right after refilling
- Flow from the spout has slowed noticeably or stopped altogether
- You see black specks, slime, or a pink-tinged film in the reservoir
- Your cat is drinking less or sniffing the water and walking away
- The filter itself looks discolored, gray, or waterlogged and falls apart when squeezed
Behavioral changes matter here as much as visual clues. Cats are picky about water taste, and a saturated carbon filter releases trapped contaminants back into the reservoir rather than absorbing new ones, which is often the real reason a cat suddenly avoids a fountain it used to love.
Factors that speed up filter wear
Certain conditions shrink the lifespan numbers above considerably. Hard water loaded with calcium and magnesium clogs mesh and ceramic filters faster than soft water does, so if you live somewhere with visible limescale on your faucets, expect to replace or clean filters more often than the package suggests. Cats that dip their paws in the bowl, drop toys or hair into the reservoir, or share the fountain with a dog all accelerate debris buildup too.
Given these variables, it helps to keep a small supply of filters for pet water fountain models on hand rather than waiting until you're down to your last one. Running out mid-week often means either topping off dirty water with a spent filter still installed or switching to a plain bowl temporarily, and if you go that route it's worth knowing whether a raised feeder actually helps your cat, because neither option is great for water quality. A three-pack tucked in a cabinet drawer solves that problem cheaply and means you're never stuck improvising.
Step 1. Choose the right replacement filter
Grabbing the first filter you find online is how most people end up with the wrong fit sitting in a drawer. Every fountain brand cuts its filter housing to slightly different dimensions, so a pet water fountain replacement filter that's a few millimeters off won't seat properly, and you'll get leaks or a pump that runs dry. Start by checking the model number stamped on the base of your fountain, then match it against the filter listing rather than guessing from a photo.
The right filter fits your fountain's exact model, not just its general size.
Match filter type to your water and household
Your tap water and your cat's habits should drive this decision as much as brand compatibility does. If you're on municipal water with a chlorine smell, activated carbon still does the best job of stripping that taste out. If you're dealing with hard water and constant limescale, a water filter for pet fountain setup built around stainless steel mesh holds up far better and won't need replacing every few weeks. Multi-cat households benefit from the same mesh option, since it handles higher debris volume without saturating as fast as carbon does.
- Activated carbon: best for chlorine taste and general odor control, needs monthly replacement
- Stainless steel mesh: best for hard water and multi-cat homes, rinse weekly and replace every few months
- Ceramic or ion-exchange: best for limescale-prone areas, moderate replacement frequency
- Combination filters (carbon plus foam): most common in budget fountains, replace both layers together
Check compatibility before you buy
Compatibility mistakes are the number one reason replacement filters end up returned. Before adding anything to your cart, pull up your fountain's manual or the product page it came from and confirm the filter dimensions, not just the brand name, since some manufacturers use the same housing across multiple product lines with different filter specs. Pet Shop Hero's guide to the best cat water fountains lists the exact matching filters alongside each model, which removes the guesswork entirely and means you're not cross-referencing part numbers across different sites.
Quantity matters too. Ordering a single filter means you're back to shopping again in a month, while a three-pack or six-pack of filters for pet water fountain models covers you for half a year and usually costs less per unit. If you're testing out stainless steel mesh for the first time, buy one to confirm the fit before committing to a bulk order, since returns on opened filter packs aren't always accepted. Once you've confirmed the right filter for your specific fountain, you're ready to move on to the actual swap.
Step 2. Gather your supplies and unplug the fountain
Rushing into disassembly without laying out your tools first is how filters end up soaking in dish soap while you hunt for a screwdriver. Before you touch the fountain, unplug it from the wall outlet and set the cord well out of the way. Working with water and electricity in the same few feet of counter space is not worth the risk, and a wet hand on a live plug is an easy way to get a shock. Give the pump a minute to fully stop running before you lift anything out of the reservoir.
Always unplug the fountain before you touch the water, every single time, no exceptions.
What you'll need on hand
Gathering everything up front turns a messy ten-minute job into a clean five-minute one. Most of these items are already in your kitchen, so you're not making a special trip to the store just to swap a filter.
- New replacement filter (confirmed to match your fountain model)
- A soft sponge or bottle brush, nothing abrasive that could scratch plastic or stainless steel
- White vinegar or a pet-safe descaling solution for mineral deposits
- A clean dish towel or paper towels for spills
- A small basin or the sink itself for soaking parts
- Cotton swabs for tight corners around the pump impeller
Skip anything with bleach, ammonia, or strong fragrance. Cats have a sharp sense of smell, and residue from harsh cleaners left in the reservoir can make a cat refuse the water entirely even after a thorough rinse.
Set up your workspace
Laying a towel down near the sink before you start saves you from wiping down the counter afterward. Move the fountain to a stable, flat surface where you have room to spread out the base, lid, and pump separately without pieces sliding into each other. If you're replacing a water filter for pet fountain that's been running for weeks, expect some standing water and slime clinging to the walls, so keep the towel within reach rather than across the room.
Once your supplies are staged and the fountain is unplugged and drained where possible, you're set up to work through the fountain piece by piece without backtracking for a forgotten tool. This small bit of prep matters more than it seems, especially if your cat is the type to hover around your feet the moment you start dismantling their water source. Getting organized now also keeps the actual pet water fountain filter replacement quick enough that the fountain isn't sitting empty and unplugged for longer than a few minutes.
Step 3. Disassemble the fountain and remove the old filter
Now that your supplies are staged and the fountain is unplugged, it's time to actually open the unit up. Most fountains come apart in the same general order: lid, upper reservoir, pump housing, then the base where standing water collects. Working through this sequence carefully avoids cracking the plastic tabs that hold everything together, which is the most common way a pet water fountain filter replacement turns into an unplanned trip to buy a whole new fountain.
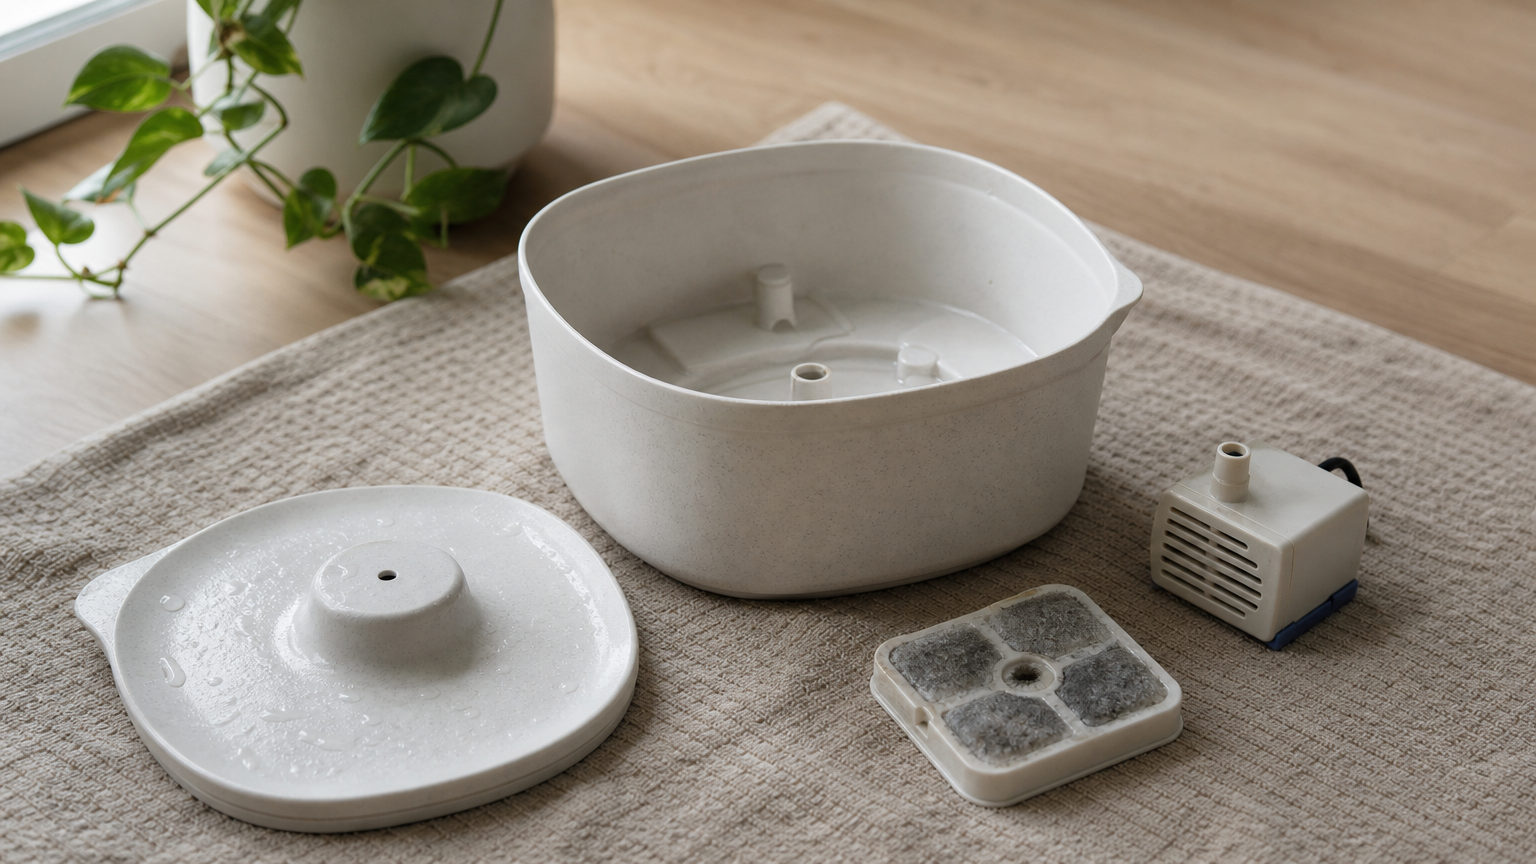
Take the fountain apart in order
Follow the same order every time you do a cat water fountain filter replacement, and you'll build muscle memory that makes future swaps faster.
- Lift off the lid or top cover and set it aside on your towel.
- Remove the upper reservoir bowl, tipping out any remaining water into the sink.
- Lift the pump housing straight up rather than twisting it, since most pumps sit on a friction-fit post.
- Separate the pump from its cover if your model has one, exposing the impeller.
- Locate the filter cartridge, usually sitting in a slot beneath the spout or wrapped around the pump intake.
Go slowly on step three. Yanking the pump sideways is how impeller blades snap off inside the housing, and a broken impeller means no water flow no matter how fresh the filter is.
Remove and inspect the old filter
Grip the old filter by its plastic frame or tab, not the foam or carbon material itself, and pull it straight out of its slot. Carbon filters often feel waterlogged and heavier than you'd expect, while a spent foam pre-filter usually has visible hair, food bits, or a slimy gray coating packed into it. If you're removing stainless steel cat water fountain filters instead, check the mesh for a chalky white buildup, that's mineral scale, and it's a sign the mesh needs a vinegar soak rather than an outright replacement.
Never touch the carbon or foam media with bare fingers if you plan to reuse it, since skin oils can clog the pores that trap odor and debris.
Set the old filter aside in a separate spot from your clean supplies, since carbon filters can drip a faint black residue that stains countertops. Take a second to inspect the slot itself for cracked plastic or a buildup of scale around the edges, because a poor seat here is often why fountains leak even after installing a brand new filter for pet water fountain models. With everything disassembled and the old filter out, you're ready to move on to cleaning every part that's been sitting in standing water.
Step 4. Clean the reservoir, pump, and housing
With the fountain apart, resist the urge to skip straight to installing the new filter. Mineral scale and biofilm build up on every surface the water touches, not just the filter itself, and dropping a fresh filter into a dirty reservoir undoes most of the benefit within days. Before your pet water fountain filter replacement is truly finished, every plastic and metal piece needs a real scrub, not just a rinse under the tap.
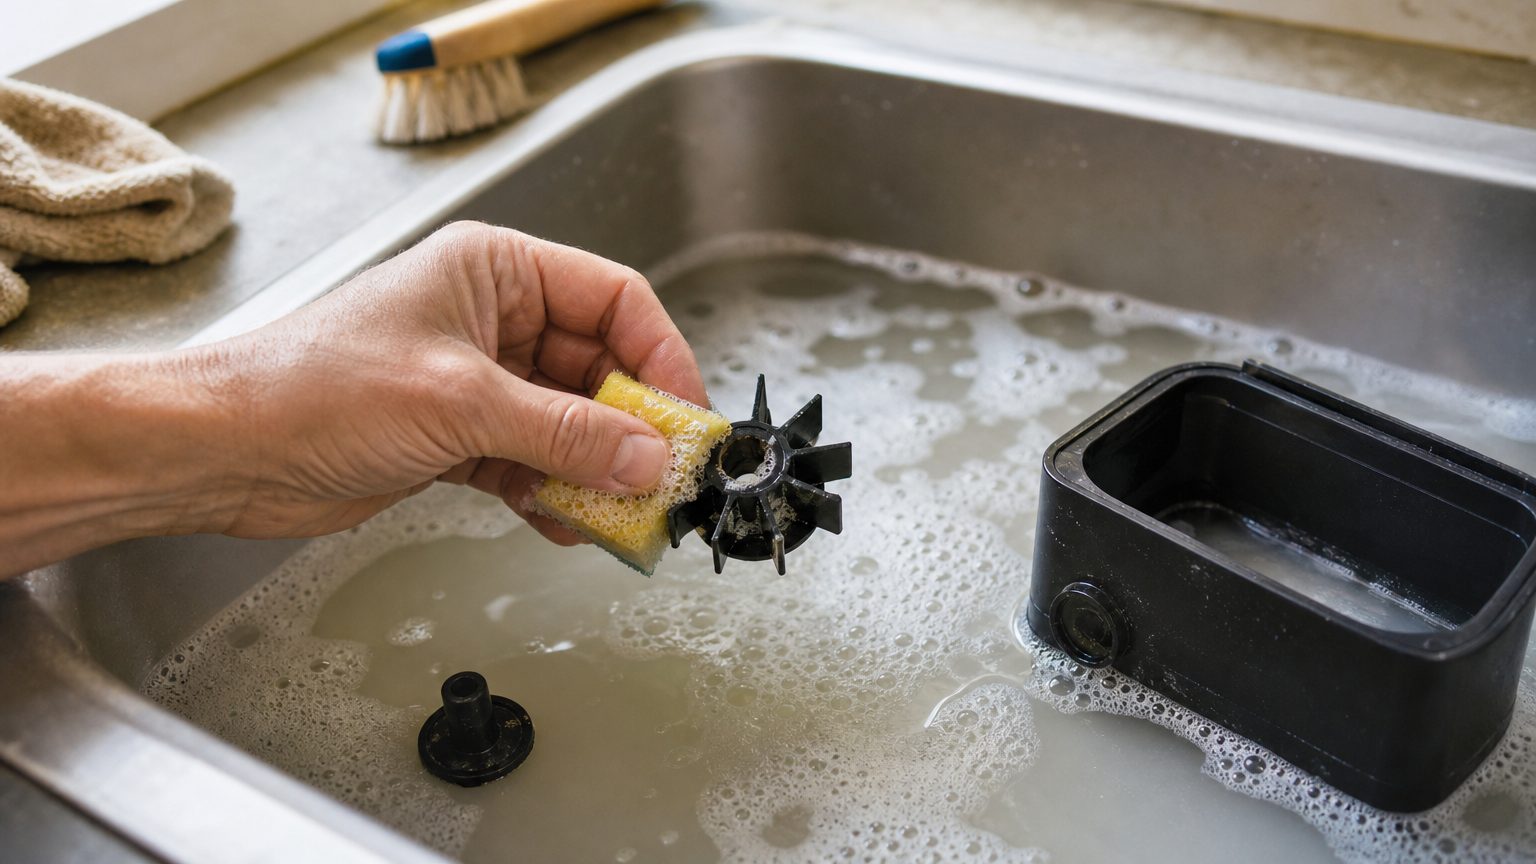
Soak and scrub the reservoir and base
Fill your sink or a basin with warm water and a few drops of unscented dish soap, then submerge the lid, bowl, and base for about ten minutes. This loosens the slimy biofilm that clings to plastic even when the water looks clear. After soaking, use your soft sponge or bottle brush to scrub every ridge and corner, paying extra attention to the spout where water flow tends to leave a thicker film. Rinse each piece under running water until no soap residue remains, since leftover suds are another reason cats sometimes turn up their nose at a freshly cleaned fountain.
Clean the pump and impeller thoroughly
The pump is where most fountains actually fail, long before the motor itself burns out. Gently pop the impeller off its shaft, since most snap on and off without tools, and rinse away the gray sludge that collects around the magnet and housing. Cotton swabs work well for the tight channels around the impeller shaft where a sponge can't reach. Check that the impeller spins freely once cleaned; if it feels gritty or catches, soak it a little longer rather than forcing it, since a cracked blade means the whole pump needs replacing.
A clogged impeller, not an old filter, is the most common reason a fountain suddenly goes quiet.
Descale with vinegar for mineral buildup
White spots or a chalky texture on any surface means mineral scale, and soap alone won't touch it. Soak the affected parts in a mix of equal parts white vinegar and water for 15 to 20 minutes, then scrub again before rinsing thoroughly, since leftover vinegar smell can also put a cat off drinking. This step matters even more if you're maintaining stainless steel cat water fountain filters, since the mesh traps scale in ways a quick rinse won't clear. Give every part a final rinse under plain water to wash away both soap and vinegar residue before you move on to fitting the new filter, since any leftover cleaning solution ends up right back in your cat's drinking water.
Step 5. Prep and install the new filter
Grabbing a new filter straight from its plastic wrapper and dropping it in is where most people go wrong. Carbon and foam filters need a quick prep step before they touch water, otherwise you're stuck with cloudy water and black flecks for the first day or two. Take a minute here and you'll skip that awkward break-in period entirely.
Rinse before you install
Activated carbon sheds fine black dust when it's manufactured and packaged, and that dust ends up floating in your cat's bowl if you skip a rinse. Hold the new filter under cool running tap water for 30 to 60 seconds, turning it so water passes through every side, until the runoff goes from cloudy gray to clear. Foam pre-filters need the same treatment, just a shorter rinse, since they mostly carry loose manufacturing debris rather than carbon dust.
Skipping the pre-rinse is the single biggest reason cats refuse water for the first day after a filter swap.
Stainless steel cat water fountain filters don't shed the way carbon does, but give the mesh a quick rinse anyway to clear any packaging residue before it goes back into a clean reservoir.
Seat the filter in the correct orientation
Most filter housings only accept the cartridge one way, and forcing it in backward either blocks flow entirely or lets water bypass the media untouched. Check the filter for an arrow, a flat side, or a printed "this side up" marking, then match it against the slot you cleaned in Step 4. If your fountain uses a combination filter with a foam layer wrapped around carbon, confirm the foam faces the water inlet rather than the pump side, since that's the layer meant to catch hair and debris first.
- Line up the notch or flat edge on the filter with the matching groove in the housing.
- Press down gently until you feel it click or seat flush against the base.
- Give it a light tug to confirm it's locked in, not just resting loosely.
- Check for gaps around the edges where water could slip past the filter unfiltered.
Confirm fit before closing everything up
A loose filter is easy to catch now and nearly impossible to fix once the fountain is reassembled and running. Look at the seam between the filter and the housing wall from a couple of angles, since gaps often show up more clearly from the side than from straight above. If your pet water fountain replacement filter wobbles or sits crooked, it's usually a sign you grabbed a filter sized for a different model, and it's worth double-checking the product listing against your fountain's model number before you go any further. A filter that seats cleanly on the first try means the rest of the reassembly goes just as smoothly.
Step 6. Reassemble, refill, and test the fountain
With the new filter seated and the housing wiped dry, reassembly should feel like reversing the steps you just took apart. Working backward through the same sequence, lid last, base first, keeps you from forcing a piece into place before something underneath is actually seated correctly. Rushing this last stretch is how people crack a tab they'd carefully avoided breaking during disassembly, so slow down even though the hard part of the pet water fountain filter replacement is technically done.
Put the pump back and rebuild the fountain
Getting the pump oriented correctly matters more than any other step here, since a misaligned impeller cover is the single most common reason a freshly cleaned fountain won't push water.
- Snap the impeller back onto its shaft, making sure it spins freely by hand before covering it.
- Set the pump housing down onto its post, pressing until it seats flush rather than at an angle.
- Lower the upper reservoir over the pump, checking that the spout lines up with the opening in the base.
- Fit the lid on last, confirming it clicks or rests flat without gaps at the seam.
Check each joint with a light push before moving to the next piece. A wobbly connection now becomes a leak once water pressure hits it.
Refill with fresh water and plug it back in
Once the fountain is fully assembled, fill the reservoir with fresh, cool water rather than reusing anything you drained earlier during cleaning. Plug the cord back into the outlet and watch the first few seconds closely, since this is when you'll catch most problems before your cat ever approaches the bowl.
If water isn't flowing within ten seconds of plugging in, unplug it immediately and recheck the impeller rather than letting the motor run dry.
Give the pump a full minute to establish steady flow before deciding anything is wrong. Some models take a moment to push air out of the lines, especially right after a cat water fountain filter replacement, and a slow start doesn't always mean a mistake.
Check for leaks and confirm normal flow
After the fountain's been running for a few minutes, run a folded paper towel along the base and under the spout to catch any drips you might not see right away. Look at the water itself too, since cloudiness that doesn't clear within an hour usually points back to a filter that skipped its pre-rinse in Step 5. Listen for grinding or rattling from the pump, which usually means the impeller isn't seated flush or a stray piece of debris slipped back in during reassembly.
- No pooling water around the base
- Steady, quiet flow from the spout
- Water runs clear within 30 to 60 minutes
- Pump motor sounds smooth, not gritty or loud
Once everything checks out, your fountain is back to full working order and ready for your cat's next drink.
Where to find replacement filters and alternatives
Finding the right cat water fountain filters replacement shouldn't mean scrolling through five different marketplaces hoping the dimensions match. Start with the source that sold you the fountain, since that listing usually links directly to the compatible filter and cuts out the guesswork of matching part numbers yourself. Pet Shop Hero's pet water fountains pages include the correct filters right alongside the fountain itself, so you're ordering a confirmed fit instead of gambling on a generic three-pack from an unrelated seller.
Buying direct versus shopping around
Generic filters sold under a different brand name sometimes fit, but sizing tolerances vary enough that a few millimeters off leaves gaps water slips through unfiltered. Ordering pet water fountain replacement filters from the same retailer as your fountain removes that risk entirely, and it usually means faster shipping since the seller already stocks the exact match. If you do buy from a marketplace listing, check the reviews specifically for mentions of your fountain's model number rather than trusting the product title alone, since some sellers list one filter under several slightly different fountain names.
Buying the filter from wherever you bought the fountain is the fastest way to guarantee a proper fit.
Stocking up and choosing multi-packs
Buying single filters one at a time means you're placing a new order every few weeks, which adds up in shipping costs and the risk of running out at the worst moment. A three-pack or six-pack of filters for pet water fountain models typically drops the per-unit price and covers you for months without a reorder. Here's a quick way to think about how much to keep on hand:
| Household size | Recommended filter stock |
|---|---|
| One cat, soft water | 3-pack, replace roughly every 4 weeks |
| One cat, hard water | 3-pack, replace every 2 to 3 weeks |
| Multiple pets | 6-pack, replace every 1 to 2 weeks |
DIY and universal alternatives
Sometimes the exact filter is backordered and your cat's fountain is running low. In a pinch, food-grade activated carbon pellets sold for aquarium filters can be packed into a spare mesh sock or the empty foam housing, though this is a stopgap, not a long-term fix, since it won't seat as precisely as a manufactured water filter for pet fountain cartridge. Universal filter discs cut to size work for some fountain shapes but rarely match the flow rate of a purpose-built filter, so expect a temporary drop in water clarity until your proper replacement arrives.
When replacing the fountain makes more sense
Occasionally the math stops favoring a new filter altogether. If the pump grinds no matter how clean the impeller is, or the plastic housing has cracked from repeated disassembly, a fresh fountain, or a pumpless option like a gravity water dispenser with a built-in feeder, often costs less over a year than chasing parts for one that's failing in multiple places at once.
Keeping your cat's water fresh every day
A fountain only stays worth owning if you keep up with the filter, and now you've got the whole routine down: spotting the warning signs, choosing the right cartridge, and working through disassembly, cleaning, and reassembly without cracking a tab or flooding the counter. Cat water fountain filters replacement isn't complicated once you've done it once, it's just a habit worth building into your monthly routine alongside food and litter shopping.
Set a reminder on your phone for every three to four weeks, or sooner if your household leans toward hard water or multiple pets. Skipping that step is how good fountains turn into stagnant bowls your cat avoids. Keep a spare pet water fountain filter replacement on hand so you're never caught scrambling, and browse Pet Shop Hero's automatic feeders, fountains and pet bowls when you're ready to stock up on filters that actually fit your model.